Solution Recipe 6: Using Google Tag Manager’s Server-Side Tagging feature to pass data to Klaviyo
Solution Recipes are tutorials to achieve specific objectives in Klaviyo. They can also help you master Klaviyo, learn new third-party technologies, and come up with creative ideas. They are written mainly for developers & technically-advanced users.
Note: We do our best to make sure any code and API references are accurate and current when this is published, but you might need to update code and it’s always a best practice to leverage our latest API versions. If you have questions, feel free to hop over to our Developer Community.
The costs and benefits of using this new feature from Google Tag Manager (GTM), and what it would look like to implement.
Server-side tagging has a lot of benefits for highly technical businesses that are hyper-focused on passing a lot of data and don’t want to be at the mercy of certain browsers or deal with the fickleness of the Document Object Model (DOM).
High
Introduction
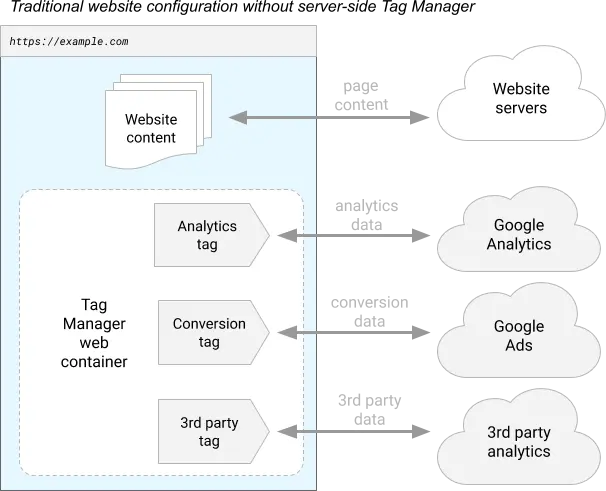
As of the writing of this article, Google Tag Manager (GTM) has recently released a beta product called Server-side Tagging. This feature allows users to use the traditional interface of tagging (Google Tag Manager — Web), but point data to third parties via Server-side Tagging that can then be routed to places like your own server, Facebook, Google, or in this case — to Klaviyo — all at once. The traditional approach that many businesses use today is to tag items on the site for actions a business would like to track (e.g. a click of a button, the view of a page, the submission of a form, etc.) and send those analytics directly from the browser to all of their systems. Server-side Tagging on the other hand uses the same browser tagging approach, but with an intermediary step of sending it to the Server-side container first. The Server-side container then is able to manage firing data to the appropriate tools.
There are lots of benefits to this approach and applying this strategy to Klaviyo, which we will explore in the next section. We have the new and traditional approaches diagrammed below:
Traditional Website Configurations with GTM
VS.
Server-side Tagging Configuration with GTM

Challenge
Companies want as much data as possible out of all of the tools they use. SaaS products for social media, analytics, marketing, rewards & loyalty and more all require their own tracking codes in order to track data to each platform.
In the past, businesses may have had relatively few of these tracking scripts running on their sites. Perhaps a business just had Facebook to target visitors with Ads and Google to track analytics to GA (Google Analytics). Today, tracking site behavior to understand who a business’s customers and visitors are has become paramount to their success. Nearly every third-party vendor that a business uses has a variation of a tracking script just like what Facebook and Google have. These scripts usually identify users when they come to the site and track the appropriate data about them in order for businesses to understand what their visitors are doing, and ultimately create more personalized experiences for their audiences.
You may see the challenge here: with so many scripts on a website, there are countless customizations to be made for each vendor a business uses, and lots of pages and actions businesses may want to tag. While most of these tags are asynchronous (meaning that the code added to the site will not visually affect the page), it leads to a lot of bloat on the page and possible load speed problems amongst some other issues, which could have a cascading effect that ends up burdening customers. Companies in this scenario are forced to leave the code up to the vendors they use, rather than having total control over what goes on behind the scenes. This is where Server-side Tagging comes into play. Below are some benefits, as well as costs associated with using Server-side Tagging over traditional methods.
Benefits of using GTM Server-side Tagging:
- Obfuscates API keys by moving API requests to the server.
- Full control over the look and shape of the payloads that get sent to third parties.
- Avoids CORS limitations by registering your own domain to the Server-side container instead of hitting services like Klaviyo, Facebook, Google etc. from the browser.
- Increased site speed. If you proxy all requests from the frontend to one single Server-side container, your external API requests that come from the browser will be limited. Any slower, synchronous API requests will occur in the Server-side container, mitigating the load on browsers.
- Reduces impact of ad blockers. Since most requests on a page will go to the same domain you registered to the Server-side container, which should match the domain that a user is on, ad-blockers will not block those requests.
- Potentially reduces 3rd party cookie policy issues that many browsers are putting in place.
- Reduces downtime of 3rd party tools during website migrations or redesigns. With everything being mostly reliant on the backend to handle passing of data to 3rd party tools, redesigning of websites will allow for quicker changes. No more need to worry about the order of events in the DOM for form submissions, clicks, page loads and other custom actions, or rewriting your code on the new site. Just listen for an event on the page, and pass it to the Server-side container to handle the rest.
Costs of using GTM Server-side Tagging:
- Price. The Server-side container uses Google’s Cloud Platform to host and run your code, which comes at a cost.
- Technical Complexity. Server-side Tagging requires advanced knowledge of programming concepts and isn’t quite as easy as just setting up a standard GTM container and using their point and click selectors to track events. Server-side Tagging code (Google uses a NodeV8 engine behind the scenes and a NodeJS-adjacent proprietary programming language called sandboxed Javascript) must be written and data must be passed in specific formats in order for this to work.
- Potential loss of features. By not relying on the 3rd party’s javascript, sometimes that can come with drawbacks. For example, without the klaviyo.js script, Klaviyo Signup Forms cannot be used on the website.
- Newness. Server-side Tagging came out in mid-2020 and doesn’t have a lot of adoption yet. It is still in beta and there are fewer default tagging templates that can be used out of the box. Most of your actions will need to be custom coded on the Server-side container.
Recipe
Objective
Generate code that functions as a wrapper for passing data to Klaviyo’s APIs within the context of a Google Server-side container.
Time to complete: A few hours
Ingredients
- 1 Google Analytics account
- 1 Google Tag Manager account
- 1 Sandboxed Javascript code in a GTM container
Omissions
The Server-side container code below relies on events being passed from Google Analytics 4, but you can pass data to a Server-side container in other ways as well. Setting up the events to pass to the Server-side container is therefore out of scope for this article. If you’d like to learn more about how you can write tags and triggers in GTM to pass data from your site to the Server-side container, check out the following resources:
- https://developers.google.com/tag-manager/serverside
- https://www.youtube.com/watch?v=XUGZMYyoDOY
- https://www.getelevar.com/guides/server-side-tagging/overview/
Instructions
The instructions below are written for an audience with intermediate or better understanding of Javascript and foundational knowledge of Google Tag Manager. Below is the code broken down into subsections in order to explain how it functions.
Step 1: Creating a Template
The first part of building a Server-side container to pass data to Klaviyo is to create a new Template. Templates allow you to create a downloadable item that has self-contained code and fields that allow for custom actions to be run. With standard GTM Web containers, there are a multitude of options in their Template Library such as templates for Slack, Snapchat, Reddit and more. Since Server-side tagging is relatively new and still in beta (at least at time of writing), there are only a couple (Google-specific) pre-built options, so we are creating our Template from scratch.
Check out the Template Gallery for GTM Web here.
Step 2: Setting up fields
Next we need to map out any variable fields that should be set by the end user of the container. Since the container will be using Klaviyo’s Track and Identify Server-side APIs, the only things that can change from user to user are:
- The data payload
- The API key (e.g. the Klaviyo Account that data should go to)
Since we will be retrieving data from GA4 and sending any event that comes through the container into a given Klaviyo account, plus, the user has full control over what gets sent through the container, the only field we need outside input on is the Public API Key. Here’s how to set that up:
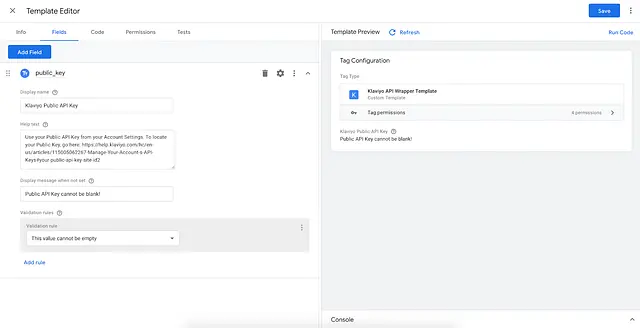
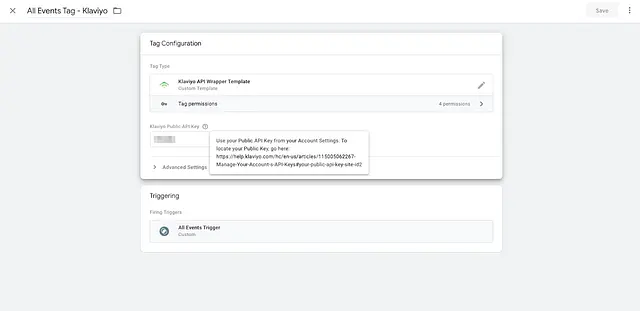
First, click “Add Field”, select “Text Input”, then make an internal name (public_key in the example below) and Label (Klaviyo Public API Key in the example below) for that field. This ends up resulting in the following when creating a Tag for anybody who uses it moving forward:
Step 3: Writing and Reviewing the Code
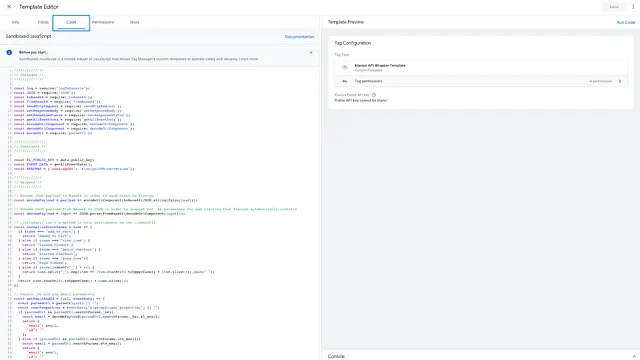
Since we are done creating the fields needed, we can now go into writing the code. GTM Server-side uses a language called Sandboxed Javascript which is very similar to NodeJS (docs). It is proprietary to Google, and runs on ECMAScript 5.1 (ES5), though some features of ECMAScript 6 (ES6) are available like const, let and arrow functions.
To get started on writing the code, we can head over to the Code panel and review what is required to get the container up and running.
Step 4: Importing Packages
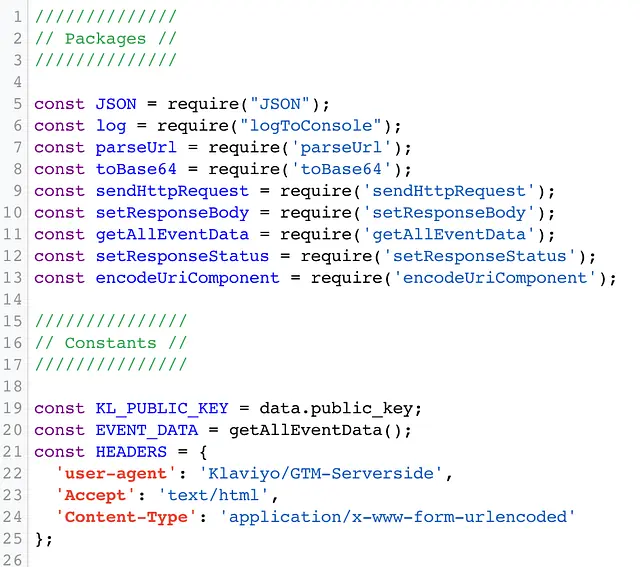
Sandboxed Javascript lets you write code like you normally would with NodeJS, but by importing different types of functionality as packages that are normally built into the Javascript language by default. At the top of the code you can see which packages were necessary to import, and you can also see any constants that must be defined as well.
Functions such as base64 encoding (toBase64), logging to console (logToConsole), and sending HTTP requests (sendHttpRequest), are all required for this use-case. A list of all these functions and more can be found here.
Below that on line 21, it is important to note that it is possible to retrieve the Klaviyo Public API key that gets input by the end user of the programmatically by using data.public_key. public_key matches the internal name of the Public Key field that was outlined in the section “Setting up fields”.
Step 5: Helper Functions
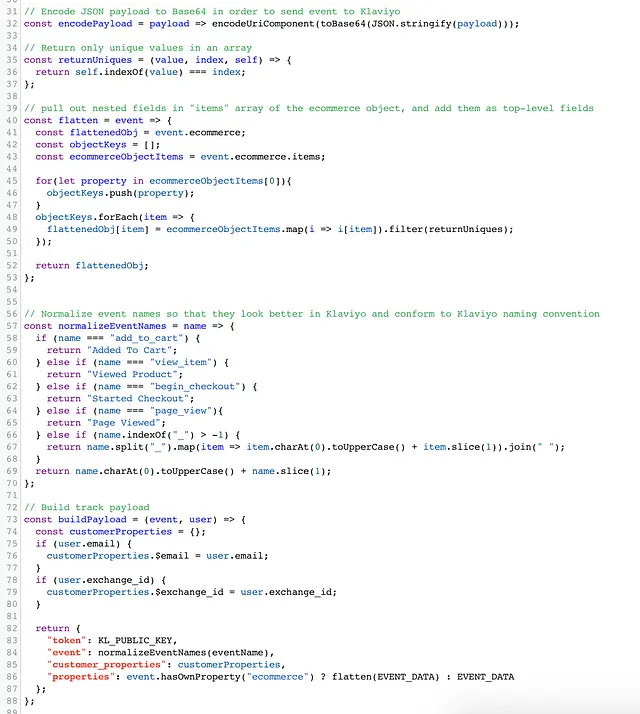
Here we have functions that the rest of our code will rely on. Klaviyo’s track API uses a GET request that Base64 and urlencodes a JSON-stringified payload, so we have a function called encodePayload.
Note: Klaviyo now offers a Track POST endpoint (same functionality) if you’d prefer using that method instead (docs)
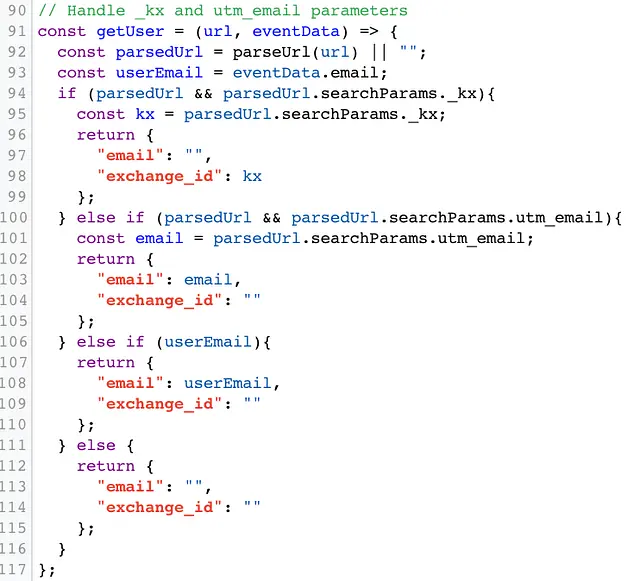
Another thing that we may want to account for is Klaviyo’s email-to-website tracking. When a recipient of your emails sent from Klaviyo clicks on a link in that email, Klaviyo automatically adds a URL parameter called _kx. We can use this value, called the “exchange token”, so that any time somebody clicks an email and goes to the site, we can get Page View events and Active on Site.
We also have a couple functions called flatten and returnUniques which will pull out any fields inside of the ecommerce object as a top-level field, and deduplicates any duplicate info from the various arrays that get generated, so Klaviyo can segment on those values. As some of you may know, Klaviyo has a schema-less database model where we can flexibly ingest data in any JSON format, but with the caveat that segmentable fields must be top-level in the JSON object, meaning it isn’t nested more than one level deep in the JSON structure. The flatten function only accounts for the ecommerce object in GTM, which comes with all events that are ecommerce related. This ecommerce object is usually built into GA4 and you can access that information within the container (docs).
Finally, we have a function for getting email of a profile inside the event, as well as a function to normalize event names so that they show up more readable in Klaviyo and so that they follow the naming convention we outline here for standard ecommerce websites.
Step 6: API Functions
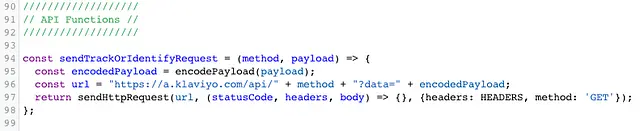
Next, we have an API function that will actually send off the data to Klaviyo. The function can take the parameter “track” or “identify”, as well as the data that you want to track to Klaviyo, and will fire a Track or Identify request to Klaviyo depending on what you pass to it.
Step 7: Execution
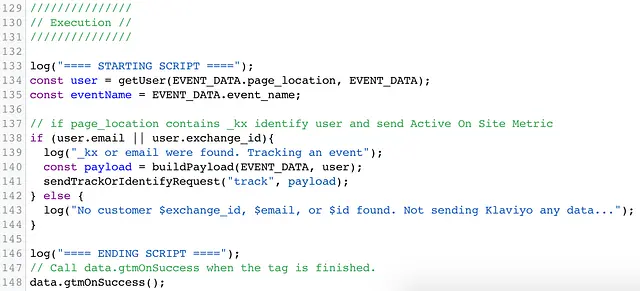
Lastly, we have the bulk of where the functions we defined earlier in the code actually get used. At first, I check for the user’s email address since Klaviyo defaults to email address as a unique identifier, or for an exchange token, as that token can be used directly in a Track Request, and I check to see if the event is a page view event. What this accounts for is that email-to-website tracking I mentioned in the “Helper Functions” section.
We check to see if the email/exchange id is known, and if it is, we will fire an event. If neither of those are known, we do not fire any event to Klaviyo.
Since all of the mapping of events happens upstream in the Client Container using GA4, all the Server-side code has to do is take in the event data that is given, and wrap API calls to Klaviyo to forward them along. As you can see, the code isn’t too complicated when broken down.
For those that are interested, below is the GTM template file for the code we’ve written. Please note, this is just example code and things can change rapidly given that the GTM Server-side feature is in Beta. We will not be maintaining or updating this code moving forward and is meant to be used simply for reference and a jumping off point.
Klaviyo Example Track and Identify from GTM Server-side
Impact
Now we have a container that can accept any GA4 event from the website, and pass it to Klaviyo easily. Once this code is written, aside from any desired feature additions or adjustments for your own environment, it should be set-and-forget. It will now be possible to use the point and click interface of GTM to map further GA4 custom events, and have them flow through Klaviyo moving forward with little to no code. This also provides improved page speed performance and a lot more benefits that we’ve discussed above.
Since Klaviyo uses a noSQL database under the hood, and has a fast and flexible asynchronous Track endpoint, writing this code requires no setup before development (beyond the creation of a Klaviyo account), and no Schema definitions. Our powerful events pipeline provides more detailed information about site and offline behavior, and having yet another way to track that information, this time through GTM Server-side, should help tremendously for brands looking to up their game.
