Solution Recipes are tutorials to achieve specific objectives in Klaviyo. They can also help you master Klaviyo, learn new third-party technologies, and come up with creative ideas. They are written mainly for developers & technically-advanced users.
Note: We do our best to make sure any code and API references are accurate and current when this is published, but you might need to update code and it’s always a best practice to leverage ourlatest API versions. If you have questions, feel free to hop over to ourDeveloper Community.
How to build a serverless webhook processor using Amazon Web Services (AWS) and how to deploy this using Terraform.
Many third party applications support sending out webhooks and our customers sometimes wonder how to sync these into Klaviyo. This recipe details how to do achieve this using a scalable and reliable webhook processing application hosted on AWS. And because it is “serverless” you won’t have to worry about headaches like provisioning infrastructure, monitoring resource consumption, patches or other things that take away from what developers like the most — writing code.
High
Introduction
Some applications support sending out webhooks when certain events occur in the application. For example, Shopify has robust, easily-configurable webhooks for when checkouts are started, orders are placed, and more. BigCommerce supports webhooks for similar actions and other applications like Stripe and Zendesk support emitting real-time webhooks as well. Klaviyo’s native integrations with these applications use these webhooks as a data source. But, what if there is an application that supports sending webhooks and you want to sync those to Klaviyo but there isn’t a native integration or connector? You could build a connector yourself — and it’s probably a lot simpler than you think.
First, let’s cover why this might sound difficult and how a “serverless” application avoids this difficulty. If you’ve ever worked as a developer, you’ve probably encountered the pain of deploying a scalable application. No matter how great your code is, it’s easy to run into bottlenecks with resources under the hood that power your application. Sure, the code may execute well on a small scale, but what happens when hundreds of thousands of requests hit your application at the same time? Is it built to scale? Will you need to reconfigure servers, update operating systems, patch applications, etc?
At some software companies, problems like this are handled by a DevOps team that helps with provisioning infrastructure, monitoring to make sure the systems remain healthy, and patching or optimizing as needed. But what if we could remove this unwanted hassle? In fact, what if we didn’t have to think about servers at all? That would make this a lot easier.
This is where the AWS service called Lambda comes in. With Lambda, we can design a “serverless” application that allows us to, as AWS puts it, “write code without thinking about servers or clusters.” We don’t have to think about management tasks like capacity provisioning or patching — they’re all handled automatically by AWS. At the end of the day, all we have to worry about is writing code to process some webhook data. In other words, it allows us to focus on the fun part, while sleeping peacefully at night.
We’ll show how this works by illustrating how to build a serverless webhook processor to take webhook data from a third-party application and relay it to Klaviyo’s APIs.
Challenge
Customers commonly want to sync data from a third-party application into Klaviyo as a destination. For example, merchants that run on Shopify or BigCommerce may be familiar that these support automated outbound webhooks — in fact, our native integrations with these systems leverage real-time webhooks. Other applications support webhooks as well, ranging from payment platforms like Stripe to messaging applications like Slack.
So, the question for these customers then becomes, how can we take event data emitted by one system in the form of a webhook and get it to Klaviyo’s APIs so it is usable in the Klaviyo application?
You may refer to this as a webhook handler, a webhook processor, or a DIY “connector”. Whatever it’s called, its job is to “catch” webhooks from one application, modify the data a bit, and then push that data to Klaviyo. We’ll show how this can be configured in a serverless way.
Ingredients
- 1 Amazon Web Services (AWS) account
- 1 AWS API Gateway
- 1 AWS Lambda function
- Optionally, use of Terraform code to automate provisioning & deployment
Technical background & prerequisites
Before getting into the solution, we should cover some important technical background. In particular, it’s worth explaining how some APIs return data and how Klaviyo expects event data to be structured for ingestion.
One of the most powerful aspects of Klaviyo is its ability to flexibly ingest data. Any time you try to move data from point “a” to point “b” you typically have to go through a process of “mapping”. Mapping is a simple concept of making sure that the source data matches the schema imposed by the destination app. For example, imagine a very simple JSON payload such as the following:
{
   "Company": "Klaviyo",
   "Location": "Boston"
}
Now, suppose I try to send that exact payload to a different application which expects the following structure:
{
   "company_name": String!,
   "location": String!
}
Since the destination expects a different key notation, it is necessary to map the data before pushing it to the target application via an API call. In the case of a simple payload, mapping should only take a couple of minutes but it can quickly become a huge pain and time commitment.
This is where Klaviyo’s data model is really helpful. Klaviyo’s ingestion engine is very versatile — we don’t require any mapping beforehand. This is because under the hood we use a schema-less data model (for event payloads and user profiles) and this in turn allows our customers and their developers to simply push data without worrying about conforming to a rigid data schema or having to configure one in advance (though we do have a few special reserved keys like $email). So, a developer can simply send data to our APIs and it will be handled from there.
Bringing it back to the webhook example, the reason this matters is that it brings up lots of possibilities for 3rd party applications that expose some kind of webhooks. Data from webhooks can effectively be “relayed” to Klaviyo’s APIs without requiring much, if any, mapping and without requiring any need for developers to define or configure a data schema in the Klaviyo app. In short, Klaviyo’s data model is really developer friendly. It means that syncing webhook data (or any data, regardless of origin) into Klaviyo can be done fairly easily.
There are a few nuances and it’s worth covering one here. Some webhooks are really lightweight. By this, we mean that some applications emit webhooks that don’t contain all the information that you might want inside of Klaviyo. In these case, you may need to “hydrate” the initial webhook data by first making some additional API calls and then aggregating all the information you’ve gathered into a single request that gets sent to Klaviyo.
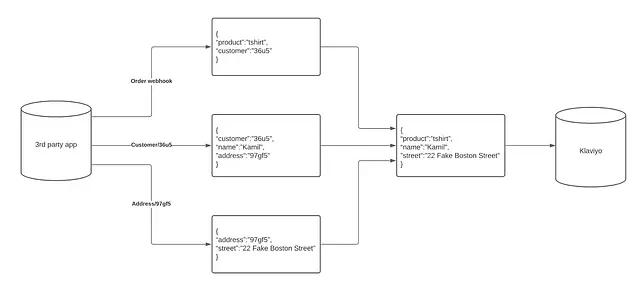
In the illustrative example modeled below, there is an initial order webhook that is very lightweight, containing only product and customer fields. Worse, the value returned for customer is just an identifier, not an email address like Klaviyo expects. In this case, we could design our solution to fetch additional information about the customer like name and address via a separate API call to the Customer resource. Additionally, in this example, the address returned by that API call to the Customer resource is also just an identifier; we could similarly make another API call to get the address in plain text. In short, in this example, we receive one webhook (the order data), then need to “hydrate” that webhook with additional data gathered from two separate API requests (to the Customer resource and the Address resource).
The bottom line is that in scenarios like this, while Klaviyo doesn’t require you to do much in the way of mapping, you might need to do some additional processing of the data to prepare it for sending to Klaviyo to ensure it has all the fields you want.
What we’ll discuss below is how to design a system that supports all of this using a few AWS services. And as a sort of added bonus, we’ll review how it’s also possible to automate the whole process of provisioning and deployment the entire solution without even interacting with the AWS console, by using something called “infrastructure as code”.
Lastly, before reading through this instructions below, I would suggest familiarising yourself a little bit with Terraform as well as a basic understanding of API Gateway and AWS Lambda. Although the guide is easy to read, basic understanding of these services will help.
Instructions
Step 1: Configure a Lambda function
A Lambda function in AWS is essentially a bunch of code that can be executed without having to run any server. There is nothing easier than creating a Lambda function in AWS. When you click on “Create Function” you will be presented with the following screen:

All you really need to do is define the function’s name, as well as the runtime environment (I am working with Python). You may use a pre-existing role, however by default Lambda will create a new role with the basic Lambda permissions. Once the function is created, you will be be prompted with the following view, containing some initial template code:
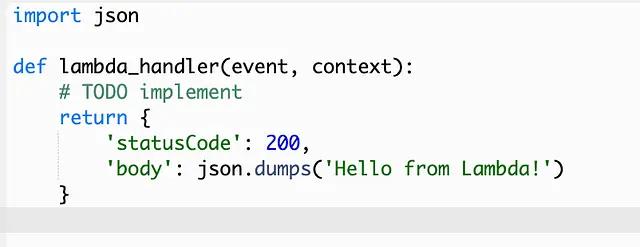
Each Lambda function requires some kind of a handler. The handler is simply the method that gets invoked during the function’s execution. The default return value is just a dictionary with a status code of 200 and a body stating “Hello from Lambda!” We obviously want our Lambda to do more than this, but hold that thought — we’ll come back to it in a minute.
Step 2: Configure an API gateway
We are now at a stage where we have a Lambda function that can be executed. But, in our case, we want it to be executed in a very particular scenario. We want it to execute when a webhook is received, i.e. when an HTTP request is received? This is where we need to implement an API gateway. This will enable us to create an API endpoint that is capable of receiving the webhook (that is, the HTTP request) and then we can connect it to the Lambda so that it is able to use the data from that HTTP request.
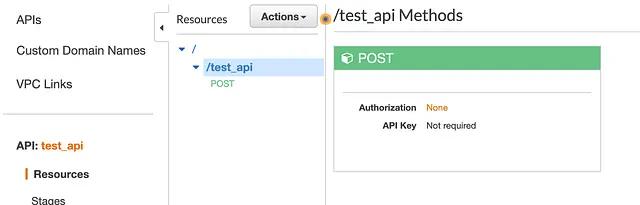
Creating a REST endpoint is very straightforward. Under the API Gateway menu, you select “Rest API” and you give it an appropriate name. Once the API is defined, you may add different endpoints, which allow you to specify the method. In my case, the webhook will arrive as a POST request and so I created a POST endpoint under the /test_api path.
Now that we have the API Gateway defined and capable of receiving POST requests, we can simply add it as a trigger to our Lambda function. That is, we can configure the Lambda function to react to each HTTP POST request received by our API endpoint.
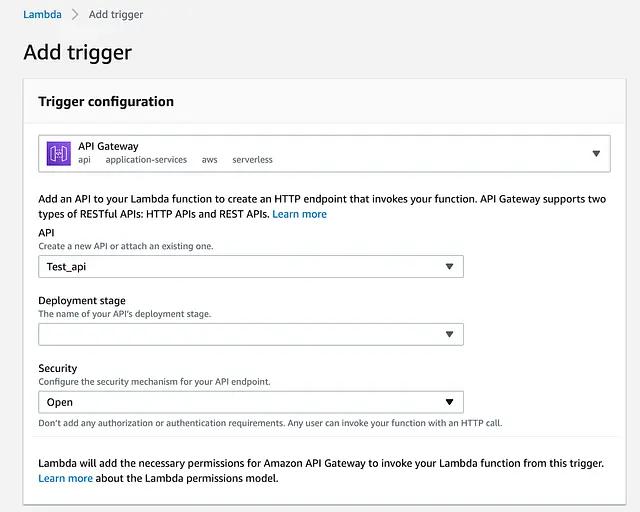
Going back to the Lambda, from the trigger configuration, I select API Gateway and the API endpoint that I have just created. I have given it an Open type for the security as I want to make this endpoint accessible. Once this is set, the API Gateway is added as a trigger on the Lambda function.
It is worth mentioning that our handler function has access to the “event” parameter which will contain all information about the HTTP requests which hit the endpoint. This is important because means we can retrieve the body or the headers of the POST request (e.g. event[“body”] or event[“headers”]).
Step 3: Configure model on top of API Gateway
In order to reject any HTTP requests that don’t follow the data structure that your API Gateway expects, the gateway allows you to define a “Model Schema”. This allows you to verify that the payload request that arrives matches what you expect. If the payload doesn’t follow the defined schema, the gateway will return an HTTP 400 response declaring it’s a bad request with “Invalid request Body” as the body of the response.
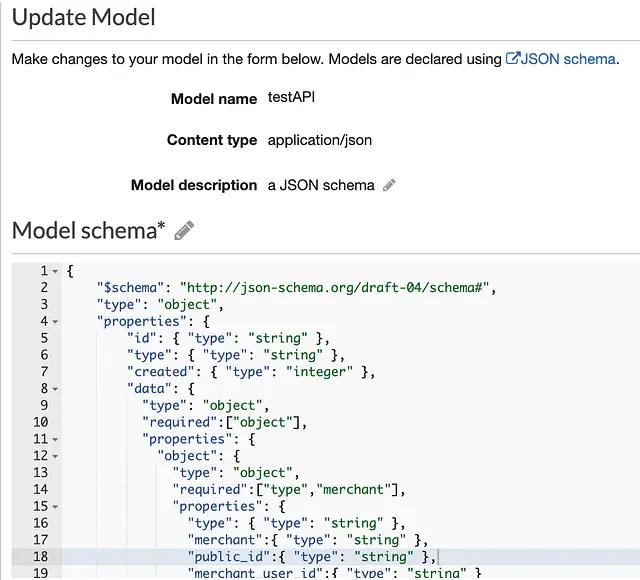
The above screenshot shows an example of a model schema defined in JSON. This ensures that only payloads that follow a specific structure are allowed into your Lambda function.
You can read more about adding a model to your API gateway here.
Step 4: Add your webhook handling code to the Lambda
Our setup is starting to take shape now. We defined an API gateway with a model verification on top of it. The request is then passed to our Lambda function where it triggers some code execution. So far so good.
But we want to do something with the data that is received, right? To do this, all we have to do now is write some Python script which will extract data from the HTTP request and optionally modify that data (or “hydrate” it as noted above by make additional API calls to enrich the data). This stage should be thought of as totally independent of the Lambda setup. It really is just scripting. The specific script that you implement depends on what actions you need to do to modify or enrich your payload. You might even code up and test this part locally, entirely independently of the Lambda. But once you have code that does what you want, you are ready to continue on.
The final step is to simply take the final payload and pass it to one of Klaviyo’s APIs. Typically webhook data reflects a timestamped action — e.g. when a subscription is created, a payment is processed, or a return is shipped — and such events should be sent to Klaviyo’s Track API. The specs for our APIs are covered in detail in our API documentation, but the gist of it is that a JSON payload can be sent to Klaviyo’s Track API as part of a POST request and will be recorded as a timestamped event on a users profile.
To summarize, we have performed the following steps so far:
- Configured a Lambda on AWS
- Configured an API Gateway on AWS with a defined model to receive POST events
- Set our Lambda to trigger when HTTP POST requests are received by the API Gateway
- Written the code into the Lambda to process data from the HTTP POST payload
If you’ve made it this far, congratulations! You have a fully functioning serverless webhook processor application, built on AWS. 🥳
Step 5: Moving to Terraform
This last step is completely optional, but is helpful if you’re going to deploy applications like this with any regularity.
We now have a simple yet robust application that runs on Lambda and can be accessed publicly through an HTTP request. The process of setting this up is straightforward but did require a number of manual steps — e.g clicking in the AWS interface to configure an API Gateway and Lambda — but if you need to deploy an application like this more than once you might want to automate it. We can do this by using something called infrastructure as code (IaS). There are two very well known IAS services on the market right now. CloudFormation (an AWS product) and Terraform (Open source project).
For the purpose of this task, I decided to use Terraform but the same result can be achieved with CloudFormation (Terraform is open source and so you may see some features in it released earlier than CloudFormation).
Without going into too much detail of how Terraform works the simplest idea is that you can write code that handles defining multiple resources which will then be created inside of AWS. Below screenshot that shows a part of the “aws_lambda_function” resource. If you break the object line by line, you realise that it is rather simple. filename points at the name of the zipped project, function_name is the unique name of the lambda function, role is the function’s execution role, handler is the function’s entry point, runtime is the environment of the function and source_code_hash is the hash used to determine updates (it basically signals if the zip file has been changed as Terraform does not check the content of the zip file and there is no point to redeploy if nothing has changed).
resource "aws_lambda_function" "test_handler" {
  filename = data.archive_file.lambda.output_path
  function_name = "test_handler"
  role = aws_iam_role.test_role.arn
  handler = "index.webhook"
  runtime="python3.8"
  source_code_hash = filebase64sha256("lambda.zip")
  publish = true
}
It is important to define each resource (this includes all different roles) as well as the resource for the API Gateway and resource for the model schema.
resource "test_api_gateway_model" "testAPI" {
  rest_api_id  = aws_api_gateway_rest_api.test_api.id
  name         = "testAPI"
  description  = "a JSON schema"
  content_type = "application/json"
  schema = file("schema/schema.json")
}
Each terraform file requires an AWS provider which provides the region to be used.
provider "aws" {
  region = var.region
}

variable "region" {
  default = "us-east-2"
}
Once all the resources are defined, all that is left is to run terraform apply. After 30 seconds or so, the entire application should be deployed on the referenced AWS account. This setup is very powerful as it allows you to deploy a fully functioning application with a few lines of code. It also allows for portability and sharing of applications. We at Klaviyo have used this, for example, to share reference applications with customers.
Final Thoughts
More and more third party apps give you the ability to trigger webhooks. These webhooks contain valuable data which merchants may like to have inside of Klaviyo. This above setup acts as a sort of middleware which receives the webhook, modifies it/enriches it, then passes it to Klaviyo.
Using Lambda abstracts the need for server maintenance (since it is a serverless service) and so all of the difficult scaling procedures are handled by Amazon. Terraform adds an extra layer of abstraction as the merchant can have the entire setup deployed with just a single command.
The only thing that needs to be changed is the code logic which enriches the payload as it depends on the webhook structure/ the data that the customer would like to have inside of Klaviyo.
